With the soaring popularity of the HGTV show “Fixer Upper” and the notable renovation work by Chip and Joanna Gaines, the term “shiplap” has transcended its humble origins and become a staple in countless homes. This versatile design element has captured the imagination of homeowners and designers alike.
Shiplap refers to installing wooden boards, often with distinctive horizontal grooves, creating visually appealing walls or ceilings. Barnwood shiplap has gained significant traction because of its unique weathered texture and rustic charm that adds character and warmth to any living space.
Let’s learn about barnwood shiplap and how it can turn your plain space into a rustic oasis.
The History and Origins of Barnwood Shiplap
Shiplap wood originates in the shipbuilding practice of laying planks on ships, edge-to-edge or overlapping, for a strong hull. It later gained popularity as exterior siding for buildings in the 19th and 20th centuries.
Meanwhile, barnwood emerged as a sought-after material, repurposed from dismantled old barns for interior wall paneling. The weathered and aged appearance of barnwood, combined with its horizontal shiplap installation, brings a captivating rustic charm to spaces.
Today, the timeless allure of barnwood shiplap continues to be embraced, adding character and warmth to modern interior design.
The Benefits of Incorporating Barnwood Shiplap

Aesthetics
- Barnwood shiplap brings a cozy and inviting atmosphere to any room. Its natural hues and weathered appearance add warmth and charm.
- The aged and weathered look of barnwood shiplap adds depth and character to walls, creating a unique focal point and enhancing the overall aesthetics of a space.
Versatility
- Barnwood shiplap perfectly complements farmhouse-style interiors, enhancing the rustic and nostalgic elements often found in this design style.
- In industrial-style spaces, barnwood shiplap adds a touch of warmth and texture, balancing the raw and sleek elements commonly seen in this style.
Environmental-Friendliness
- Using reclaimed barnwood for shiplap helps reduce the demand for new wood and promotes sustainable practices. It repurposes existing materials, reducing the need for logging and preserving forests.
- By repurposing old barnwood, shiplap contributes to waste reduction. It prevents valuable materials from ending up in landfills, promoting a more eco-friendly approach to interior design.
Practical Uses and Design Ideas for Barnwood Shiplap
Here are some design ideas to inspire you once you decide to incorporate barnwood shiplap into your home:
Wall-to-Ceiling Shiplap
Wall-to-ceiling barnwood shiplap installations offer a cohesive and visually impactful design choice that helps define a space while drawing attention to its furnishings. Extending the shiplap pattern from the walls to the ceiling creates a seamless and harmonious look, creating a sense of continuity and style.
Furthermore, playing with different colors on the shiplap can cleverly manipulate the perception of space, making a room appear larger or smaller.
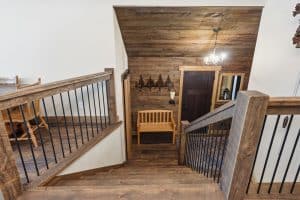
Hallway Opening
Harnessing the power of vertical lines, barnwood shiplap installations can effectively elevate the visual appeal of a space and create an illusion of height, particularly in areas like hallways. By incorporating a barnwood shiplap ceiling in a narrow hallway, the vertical orientation of the boards draws the eye upward, making the space feel taller and more expansive.
This design technique can also be applied in small dens, patios, or any area where you desire to introduce visual texture and enhance the perception of openness.
Rustic Bathroom
The beauty of shiplap lies in its ability to embrace a more rustic and vintage aesthetic, as it doesn’t require a polished appearance to exude charm. Opting for a matte finish with shiplap can evoke a delightful vintage feel without appearing overly formal or refined.
Moreover, the horizontal lines created by shiplap installation can work wonders in small spaces, such as bathrooms, by visually expanding the room’s perceived size.
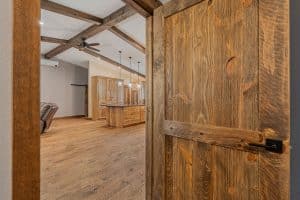
Build a Barn Door
When it comes to barn doors, incorporating shiplap can elevate their charm even further. Adding shiplap to a barn door is a simple yet impactful project that effortlessly infuses character into any space. This small addition delivers a substantial boost, enhancing the door’s visual appeal and unique character.
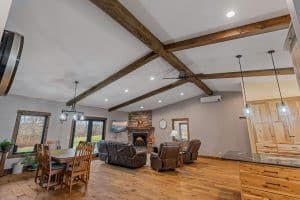
Shiplap Fireplace
Not only does shiplap over the fireplace create a captivating focal point, but it also adds a touch of charm and character to the space. The beauty of shiplap lies not only in its visual appeal but also in its affordability compared to traditional brick.
With barnwood shiplap, you can achieve a stunning fireplace without breaking the bank while adding a touch of elegance to your living room.

Expert Tips for Installing Barnwood Shiplap
If you’re considering adding barnwood shiplap to your home, it’s essential to know some expert tips for both installation and maintenance to achieve the best results. While the charm and allure of barnwood shiplap are undeniable, proper installation ensures longevity and a polished appearance.
There are various methods to install barnwood shiplap, each offering a unique look and feel:
- Gluing it directly to the wall with construction adhesive
- Nailing it directly to the wall with finished nails or brads
- Using furring strips as an intermediate step
Taking the time to gather the right tools and properly prepare your space can significantly impact the quality of your installation. A well-prepared work area not only streamlines the process but also helps ensure a polished, professional finish, allowing the natural beauty of barnwood shiplap to shine through.
Additionally, it’s important to consider the preparation of the wall surface and the type of finish you want to achieve. Properly measuring and cutting the barnwood can ensure a seamless and professional installation.
To install barnwood shiplap, you will need the following tools and materials:
Equipment & Tools
- Hand saw with fine teeth
- Miter box
- Laser level
- Electric brad or nail gun
- Cordless drill
- Finish nails
- Stud finder
- Pencil
- Set of drill bits and drivers
Materials
- Interior-use shiplap
- Drywall screws, 2-inch
- 6 1-by-3s
Installation Instructions
1. Condition the Shiplap to the Room
- Unbox and lay out the shiplap in the room to adjust to the temperature and humidity.
- Remove any outer plastic wrap.
2. Prepare the Walls for Installation
- Use scraping tools to level down bulges or protrusions on the walls.
- Remove baseboards and trim.
3. Identify the Studs’ Positions
- Use a stud finder to locate and mark the positions of all the studs on the wall.
- Mark every 16 inches, on-center, with two marks: one near the ceiling and another near the floor.
4. Mount the Furring Strips
- Dim the lights and use a laser level to project a vertical line along each stud.
- Place a one-by-three furring strip at the center of each mark and secure it with four drywall screws per board.
5. Establish the First Row of Shiplap
- Use the laser level to shoot a horizontal line near the ceiling.
- Install the first row of shiplap parallel to the line, leaving a 1/8-inch gap between the ceiling and the top of the row.
6. Nail the Shiplap
- Drive nails into the tongue part of the shiplap, ensuring the overlapping rows will cover the nails.
- If space is limited, use a cordless nailer for face-nailing.
7. Continue the Rows of Shiplap
- Install subsequent rows of shiplap below the first row, ensuring the ends rest on furring strips.
- Cut shiplap to length using a fine-toothed saw.
8. Install the Last Row of Shiplap
- Place the last row parallel to the floor, leaving a 1/8-inch to 1/4-inch gap.
- If the gap is too wide, rip a shiplap board lengthwise to the desired size and face-nail it into place.
- Reapply the baseboard molding to cover any remaining gaps.
Maintaining the Beauty of Barnwood Shiplap
After adding barnwood shiplap to your home, it’s important to care for it and ensure its lasting beauty. While certain marks enhance their character, watermarks and stains are best avoided. Follow these essential tips to ensure your barnwood shiplap remains visually appealing for years.
Get Wood Cleaner
To retain the vintage look of reclaimed lumber, waxing is essential. Opt for a high-quality wax specifically designed for this type of material. Traditional wood waxes may alter the color and appearance, so invest in a suitable polish to ensure optimal results for your wooden structure.
Avoid Harsh Conditions
Sunlight and UV rays can cause color fading, while frequent temperature changes may lead to shrinking and splitting. Consider using a humidifier to maintain optimal moisture levels and protect the wood’s integrity.
Be Mindful of Products
In addition to using quality wax and proper cleaning techniques, it’s crucial to consider the products you use around your recycled wood. Many household cleaners contain harsh chemicals that can strip the natural finish of the lumber. Avoid spraying cleaning products near your wood paneling and promptly remove any overspray to preserve its integrity.
Restore Only When Needed
Like any material, recycled wood is prone to wear and tear. To prolong the life of your floors and panels, it’s important to recognize when restorations are needed. Applying high-quality wax every few years rejuvenates the structures. Additionally, promptly fixing minor damage prevents it from accumulating and causing significant issues.
Bring the Warmth of Aged Barnwood Shiplap to Your Home
Barnwood shiplap adds a unique touch to any space with its rich history and rustic allure. Whether used for accent walls, ceilings, or other creative applications, it’s a surefire way to create a cozy and inviting atmosphere in your living environment.
Transform your space with the timeless beauty of Forever Barnwood’s interior walls. Our decorative and rustic barnwood wall boards, treated with our patent-pending process, offer the perfect solution to bring your vision to life. Explore our collection and create the inviting atmosphere you’ve always wanted.